Saturday, March 27, 2010

Small Coffin Smoother- Part 2

As I left off, the plane was gluing. While the glue set, I worked on the rosewood sole. This involves cutting a hole for the blade to protrude through. I took some pictures, but someone (who will remain unnamed) deleted them. I'm sorry, because not only did they include visuals of what I'm trying to explain here, they included the answer to life, the universe, and the reason that my Pb & J sandwich is always squished.

To begin I drilled a series of small holes where the mouth will be. Then I connected them with a fret saw, and filed them flat. It is essential to leave the mouth too small, this can be opened up later. The bed angle needs to be worked into the back of the mouth opening. I made a ramp with the same incline as the bed angle, and used that to guide my chisel to make the cut. Leave the entire sole oversize, that can be trimmed down later. The sole is glued onto the body (after the surfaces have been smoothed and flattened) using epoxy. It is very important to align the parts accurately. I drove really small nails into the plane body, and clipped the heads so the protruded out about 1/16". This reduces the amount the sole will shift while being glued. Let the epoxy set according on what open time the package says. I didn't, I un-clamped it too soon, and the epoxy failed. So I had to re-glue the corner that came off.

The wedge is a nice looking design, but a hassle to make. It is at 10 degrees, to match the other angles. I sawed the angle out, and used my float (carefully!) to smooth the mating edges. With this done, I shaped the top portion using chisels, my float, and sandpaper. After the wedge, the plane is essentially done, I shaped the sides into a coffin shape, with a block plane and finished up with sand paper. To ensure crispness of all the details, I sanded first, and then cut the long chamfers with a spokeshave, and the short chamfers with my float. I flattened the sole of the plane with sandpaper and gave it two coats of oil.


Now onto the fettling. I was having problems with shavings just bunching up, and not being fluffy and nice. I opened up the throat area, removing any material that might have caused bunching, and tried it again. Definite improvement. Then I tried opening the mouth slightly and bingo! Nice easy planing. Here is a group shop, so you can see its size. It's really small. I can't tell a really big difference between this plane's resultant surface and my Stanley #4's, but it is a handy size, and works pretty well. One thing I don't like is the weight. I have to press pretty hard down onto it in order to get a good cut. But for a first wooden plane, not so bad!

Saturday, March 20, 2010

Leather For Workbench


I added some leather to my leg vise, and to my dogs. I can tell that the gripping power is much improved. I also built a new shooting board. It is more robust, and has a low friction plastic strip screwed to it so the plane's side will slide smoother. And lastly, I cut off part of my wagon vise hand crank because I was tired of it protruding above the bench top. That's all for now, I have to figure out what to do with all of this leftover leather.

Wednesday, March 17, 2010

Instant Bungee Lathe

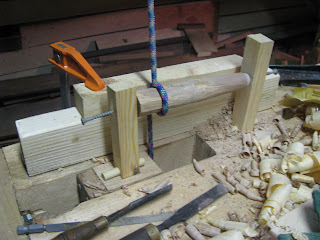
After seeing a post on the Woodworking With Hand Tools blog, I was inspired to make my own end-vise lathe. I found this article all about making and using this kind of lathe. Here is what I made: As you can see, the bungee cord is strung parallel to my bench, with the power cord tied to the middle of it. The power cord (blue in my lathe) wraps around the piece being turned. The cord goes through the gap for the wagon vise and is attached to a foot pedal. There are two wooden dogs with blunted screws that pinch the workpiece.
Before I built this lathe, I thought it would be inefficient, as you can only cut on the down stroke, but in reality you develop a nice rhythm.

The piece I am turning is dogwood. Be sure to at least make your piece into an octagonal shape, otherwise it will be too rough.

I would like to make some improvements to my set-up. First I want to make a better tool rest. I also want to make a more substantial foot pedal mechanism. I also want to experiment with different kinds of rope for the power cord (my current one is nylon, which I've heard is slightly slippery).

To see more videos of pole lathes in action, see Robin Wood's Youtube Channel.

Thursday, March 4, 2010

*New* Podcasts

I watch all the free woodworking videos that I can get my hands on, and am very pleased that the world of high-quality woodworking podcasters is slowly growing.

Rob Bois has recently added the videos from his blog to iTunes. For me, this simplifies video watching considerably. He is in the process of documenting a cherry jewelry box.

Another podcaster who I've been watching is Bob Rozaieski over at the Logan Cabniet Shoppe.
He has been documenting a Porringer Tea Table build- all with traditional hand tools. He also has some great episodes about different types of tools, and how to use them.

These are two more woodworkers who are nice enough to take the time to film, edit, and post videos in their shops. Be sure to check them out!

Monday, March 1, 2010

I have way too much time

Workbench Tips and Updates

After working with my bench for a while, I have made some minor changes to it. First I added thin maple springs to my dogs, which is something that I had been meaning to do for a while, but I hadn't gotten around to doing so. While working on my coffin smoother (which is almost done!), I cut my hand on the edge of my vise chop. Apparently the chamfers were too sharp! So I rounded over the top edges of my chop (except for the side that clamps the work). You can still see some blood on there. Next, I drilled another holdfast hole near the left end of my bench. This I will use for doing tasks such as chopping out dovetails an mortises. When I do tasks such as dovetailing, small stock dimensioning, mortising and tenoning, I like to have different stations set up for different tasks. As you can see in the photo, I have the right end of my bench with different stations. From left to right: shooting board and plane, bench hook and crosscut saw for crosscutting, wagon vise for face planing. In this photo I have the right end of my bench set up for dovetailing. I have a piece in my leg vise, and a piece ready for chopping on the left. The holdfast is in the new hole.
I also made some purchases. I bought a Hock plane blade for my #4, some forstner bits, and a small float. Here are two 1/4" holes drilled by the forstner bit, and a twist bit.

And finally a new project! This is a rough design, I think I will go with the leg on the front right. It will have a drawer, and possibly breadboard ends. I'm not sure which what wood I'm going to use, maybe walnut, cherry, or soft maple.