
I have wanted to make a new marking gauge for a long time. My first one I built was sub-par. For my marking gauge #2, I wanted to fix the first's shortcomings. This is one thing that is very important in toolmaking. To know what you want to make, and how you don't want your tool to perform. The problem is that you probably won't get it totally right the first time. So what do you do? Do you buy more fancy materials, or do you just live with the tool that works, just not as well as it could? As a hobbyist, sometimes I can't justify making a new one. Prototypes sometimes help, sometimes not. Back to the marking gauge, my old gauge locked down securely, but the "blade" was a sawn-off nail that wouldn't stay in place, so the gauge didn't mark a clear line. Also, the body always seemed too shot to register well on the work. In the new gauge I fixed these problems.
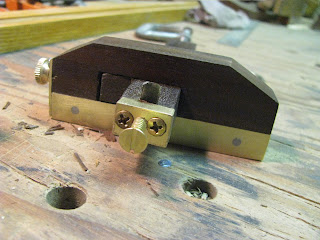
To begin I selected a 3/4" thick board about 6" long. I cut a rabbet for the wear plate, and then trimmed the body to final length: 4". I made a mortise, for the arm, and for the traveller. It is very important to make the arm oversize, and then to plane it down to a fit where it slides smoothly with no play. The locking mechanism is illustrated in the picture.

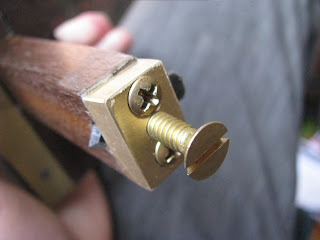
Both the nut and thumb nut are epoxied in, the nut embedded is not. this means that when I turn the thumb nut counter-colckwise, the traveler will travel away from the plate of brass. The wear plate is secured by 3 steel screws that were filed flush. The blade-holder is crude looking, but works extremly well. There is a small groove cut in the end of the arm.

This holds the blade and prevents it from moving left to right. The center screw in the brass clamps the blade in. The blade is a old jigsaw blade.


 Both the nut and thumb nut are epoxied in, the nut embedded is not. this means that when I turn the thumb nut counter-colckwise, the traveler will travel away from the plate of brass. The wear plate is secured by 3 steel screws that were filed flush. The blade-holder is crude looking, but works extremly well. There is a small groove cut in the end of the arm.
  This holds the blade and prevents it from moving left to right. The center screw in the brass clamps the blade in. The blade is a old jigsaw blade.


